Roster:Install
| Important note: When you edit this page, you agree to release your contribution into the public domain. |
Contents |
Roster Installation
Installation guide
Installation Overview
- Make sure your web host supports MySQL and PHP
- See Roster's Requirements
- You'll need your login info to your MySQL and a database setup that Roster can use
- Download Roster
- Optional: Download the Interface Imagepack and configure Roster to use local images
- Decompress the downloads on your local machine, then upload the expanded files to your site
- Most installs end up installing Roster in "www.[domain].com/roster"
- Browse to the roster installation, www.[domain].com/roster/
- Follow on-screen instructions
- Roster is now installed...
- Configure Roster by going to RosterCP and checking out all the settings
- Check out the First Upload instructions for help
- Have members install CharacterProfiler (and optional PVPLog)
- Deputize people you trust with the Roster Upload/Officer password to also run GuildProfiler
- Profiler Add-ons can be downloaded here
- Have everyone upload their data with regularity or look into using UniUploader, javaUniUploader, or phpUniUploader
- You can also use UniAdmin to distribute AddOns and settings to UU, jUU, and phpUU
Hints
- Do not simply upload the zip file to your provider
- You should unzip to your desktop then upload the contents of the archive, and make sure to keep the file and directory structure intact!
Local Interface Images
- Download the Interface Imagepack
- It's easiest to unzip the files on your desktop and figure out where they go after you've done that
- Configure Roster to point to where you extracted the Inferface folder to
- If using local images, make sure you get the Interface Image Pack
- Every time Blizzard creates new icons for items, talents, spells, etc... a new image pack is released
- For full functionality, be sure to have all current image packs installed
- We keep a full zip archive with the latest files, and some upgrade zip archives
- Configuring Roster (*ROSTERDIR*/?p=rostercp | *ROSTERDIR*/rostercp.html) - ACCESS VIA WEB!
- Check out the First Upload instructions for help
- Do not worry about GuildProfiler.lua
- There's nothing you need in there, either during installation or when updating information
- All the info you should care about is in CharacterProfiler.lua
Installing Roster
Pre-install
This step is optional
The installer can attempt to create the database, if you provide a user with sufficient privileges to do so.
This information will not be stored and only used in the creation of the database.
Create, or have ready a MySQL database that WoWRoster can use.
It should already have a user name and password assigned to it.
(See Figure 'phpMyAdmin Create Database')
(See Figure 'phpMyAdmin Database Created')
Step 1
Making sure to keep the directory structure intact, move the unzipped files to a web-accessible directory. (see Hints section above)
Step 2
This step might not be necessary
This may only be needed if you are having problems running or installing Roster
All files and directories should be owned by your web server's user/group
(Example: chown apache.apache -R *).
All .php files should be readable
$ chmod a+r -R *.php
Step 3
If you want the installation script to automatically set up your conf.php file for you, it should be readable/writable
Note: The installer will attempt to do this for you, but should an error occur, you may need to do this manually:
$ chmod 666 conf.php
Step 4
Browse to www.[domain].com/roster/
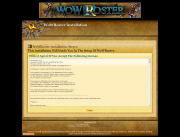
You should be presented with a license agreement page.
(See Figure 'WoWRoster Install Step 0')
If you see the error message "You removed the license.txt file. This file MUST be present to install WoWRoster!"
Then you must restore the license.txt file
Part of the agreement to install and use WoWRoster is keeping this file intact.
Click the [ I Agree ] button.
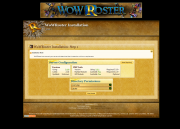
You should be presented with a page describing your server's settings and information.
Once you are sure that your server meets WoWRoster's requirements, you can click the [ Start Install ] button.
(See Figure 'WoWRoster Install Step 1')
On this step, you may be presented with information or errors
- The message will also contain a solution if it is an error
- The conf.php file does not exist and could not be created in Roster's root folder.
- You must create an empty conf.php file on your server before proceeding. And give it write access
- The conf.php file has been created in Roster's root folder
- Deleting this file will interfere with the operation of your Roster installation.
- The file conf.php is not set to be readable/writable and could not be changed automatically.
- Please change the permissions to 0666 manually by executing chmod 0666 conf.php on your server.
- conf.php has been set to be readable/writable in order to let this installer write your configuration file automatically.
- The cache directory could not be created, create a directory named "cache" manually in the root directory.
- The cache directory exists, but is not set to be writable and could not be changed automatically.
- Please change the permissions to 0777 manually by executing chmod 0777 cache on your server.
- The cache directory has been set to be writable in order to let the Template engine to function.
Under "Directory Access" if you see a red image next to "Cache:"
Hover over the image for more information
If you see "Connection to wowroster.net failed." in the "Version" box
This means your server cannot contact wowroster.net for latest version checking during the install
If all is good in the universe, you will see this message
"Roster has scanned your server and determined that it meets the minimum requirements."
Click the [ Start Install ] button.
Step 4-1
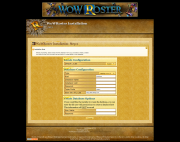
(Figure 'WoWRoster Install Step 2')
- Default Locale:
- Choose the default locale setting for WoWRoster
- Database Type:
- Select your database engine here
- Database Host:
- Your MySQL server name.
- If it resides on the same server as the web server, you should enter 'localhost'
- Some hosts may not have the MySQL server on the same server as the web server, so you should contact your host and get the correct server location
- Database Name:
- The name of the database you created for WoWRoster, usually 'roster'.
- Database Username:
- The user name with permission to access the database.
- If you didn't create the database yourself, your host should have given you this information.
- Database Password:
- The password used with the user name from above.
- Prefix for Roster tables:
- Simply prefixes the name of each table that WoWRoster creates and uses.
- The default of 'roster_' should be sufficient for most installations.
- Main Site URL Link:
- Should be detected automatically by the installation script, but if not just put the domain name of your server here
- ( ex: http://www.[domain].com )
Create Database Options
If you would like the installer to create the database, you can enter the db user with permissions to create a database here
This information will NOT be saved
- Database Create username:
- User name with privileges to create new databases
- Database Create password:
- The password used with the user name from above.
Step 4-2
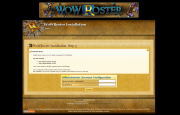
WoWRoster Administrator Account Setup
A message about MySQL will always appear, this is mainly informational unless your MySQL server version is not high enough to run WoWRoster
MySQL server version 4.1.0 or higher is required for Roster.

You are running:

    * Your server version: 5.0.45-Debian_1ubuntu3.3-log
    * Your client version: 5.0.45

Your server meets the MySQL requirements for Roster.

Your configuration file has been written with the initial values
But installation will not be complete until you create an administrator account in this step
(See Figure 'WoWRoster Install Step 3')
- Administrator Password:
- A password of your choosing.
- Administrator Password [ confirm ]:
- Simply re-type the password to verify it.
- Note that the guild/user and officer/upload passwords will be set to this as well
- You can change them later via RosterCP
After you're satisfied with the values for the above fields, click the [ Proceed] button to continue.
Step 5
The installer will automatically fill your conf.php file.
(See Figure 'WoWRoster Install Step 4')
If the creation of conf.php failed, the installer will give you code to copy and paste in this file.
You will be notified if your passwords didn't match, and it will be reset to a default of "admin"
You can change this later by going to Roster Config.
This will also be the password for the Officer/Upload and Guild/User logins, change them via RosterCP
Enter your WoWRoster Admin password to navigate to the After Install Guide
The After Install Guide helps you configure WoWRoster for first time use
you can skip this step by clicking "Skip install guide ->"
You should now have a functional installation of WoWRoster.
Remove the files install.php, upgrade.php and the install/ folder for extra security.
Navigate to Roster Control Panel
This is where you can configure all aspects of WoWRoster.
Upgrading Roster
As always, we recommend a fresh install, in a clean folder, and a clean database.
But for those that absolutely need to upgrade, we have worked really hard for you on the upgrade script.
Special Instructions for < Version 2.0.0
There is no upgrade path from versions lower than 2.0.0
This is because Roster 2.0.0 gathers much more data from WoW than earlier versions and causes errors in the core files when the database is upgraded.
General Instructions
Step 1
BACK UP YOUR DATABASE.
This cannot be stressed enough.
You should consider using phpMyAdmin (http://www.phpmyadmin.net)
This can use 'Completed Inserts' that will be necessary if you need to restore the database.
Step 2
Seriously, go back up your database since you skipped step 1.
Step 3
Back up your conf.php file.
Usually we would never touch this file during an upgrade...but just in case something weird happens
Step 4
Unzip the new WoWRoster version.
Overwrite ALL files!
It's best to delete everything in the roster folder EXCEPT! your conf.php file first, before copying over files.
Step 5
Access www.[domain].com/roster
Select the version you're upgrading from.
The script will perform all the necessary changes to upgrade from the version you selected to the newest version.
Step 6
Navigate to RosterCP, this is where you can configure all aspects of WoWRoster.
Remove the file install.php for extra security.
Re-Installing Roster
Perhaps there has been some weird problem that you cannot solve
Such as database corruption, updating errors, data errors, etc...
You can try re-installing Roster
Pre re-install
Make sure you have the install directory and install.php in your roster folder on your web server
Step 1
Delete conf.php from the roster directory
Step 2
Drop all `roster_` tables in the database you created for Roster
Note: `roster_` may be different if you changed the table prefix
You can also just drop the database you created for Roster
If you didn't create a new database for Roster, use the first method for removing the tables
Step 3
Run install.php
Un-Installing Roster
First of all, we'd like to thank you for trying our software and hope it was a good experience for you
Sometimes Roster doesn't work on all servers although we try our best to improve this aspect
Step 1
Remove/delete the roster directory from your webserver
Step 2
Drop all `roster_` tables in the database you created for Roster
Note: `roster_` may be different if you changed the table prefix
You can also just drop the database you created for Roster
If you didn't create a new database for Roster, use the first method for removing the tables


